よくIoTでMQTTとかってあるけど、実際にどんな感じで使うのか?という事で…自分がよくやる環境について書いておく。
– 環境
サーバ : Ubuntu 14.10
端末 : Spark
– SparkのLEDをMQTTでチカチカさせてみよう
まず最初にSparkのLEDを光らせる。
1. mosquittoをUbuntuにインストール
サーバにMQTTサーバであるmosquittoをサクっとインストール。
apt-get install mosquitto mosquitto-clients
2. SparkでMQTTを使う
まずはMQTTのライブラリを探す。ライブラリのタグからMQTTと入力すると出て来る。
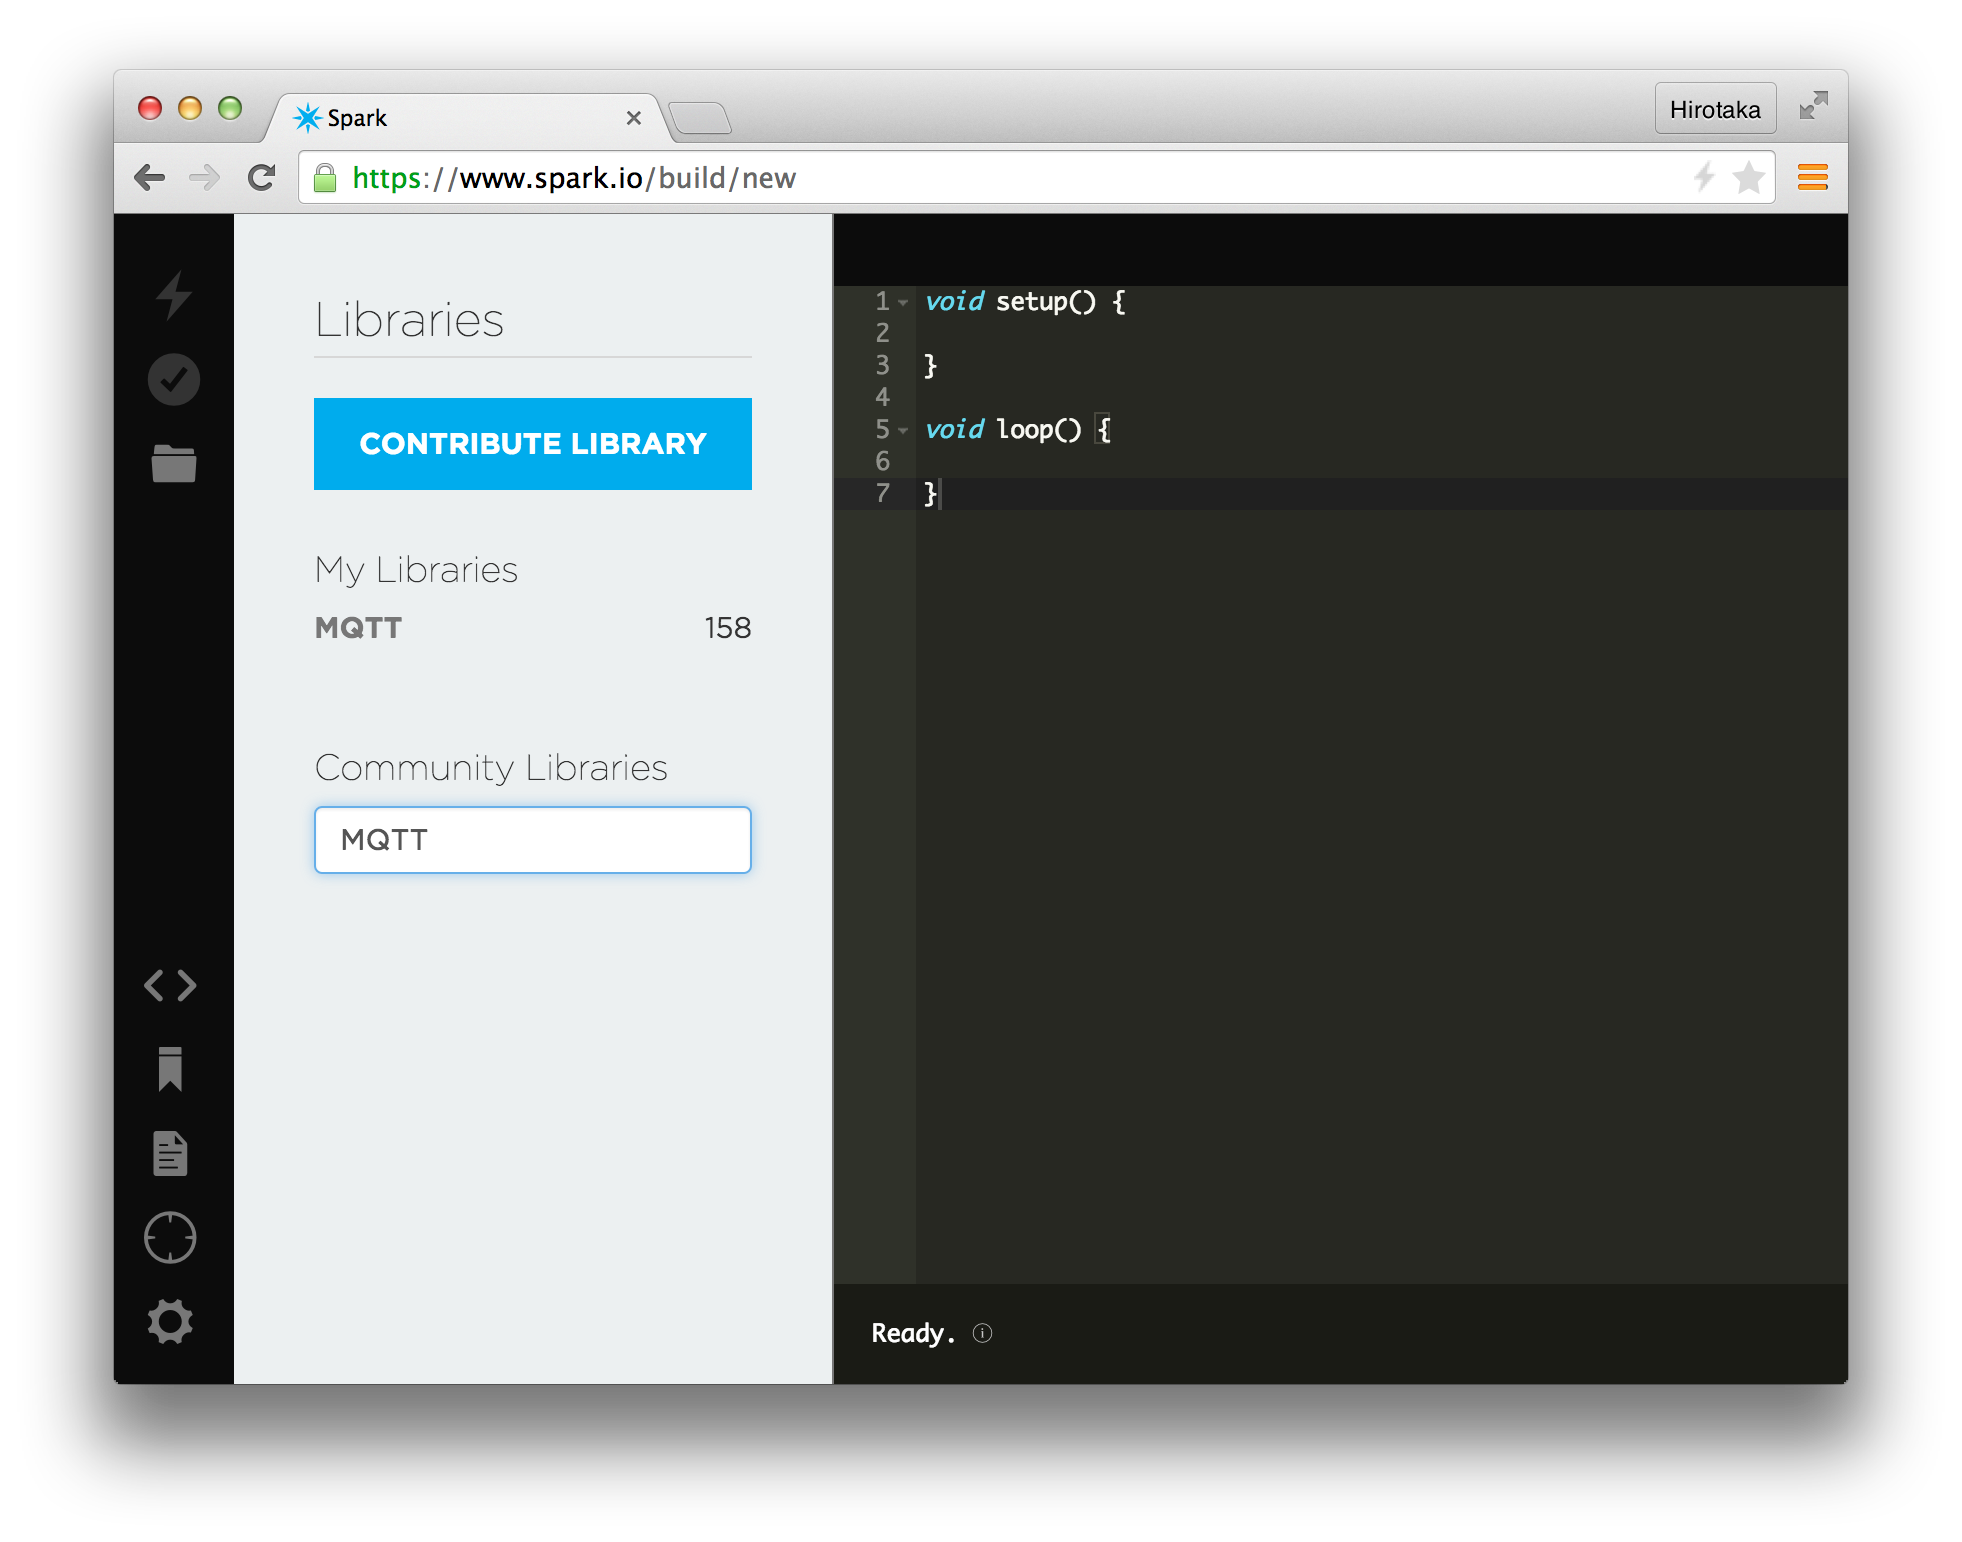
ライブラリの”MQTTTEST.INO”を選択して”USE THIS EXAMPLE”をクリック。そして、以下の”server_name”の所にさっき立てたMQTTサーバのIPかドメインを設定する。
# MQTT client("server_name", 1883, callback);
# IPの場合
byte server[] = { 157,XXX,XXX,XXX };
MQTT client(server, 1883, callback);

# ドメインの場合
MQTT client("www.hogehoge.com", 1883, callback);
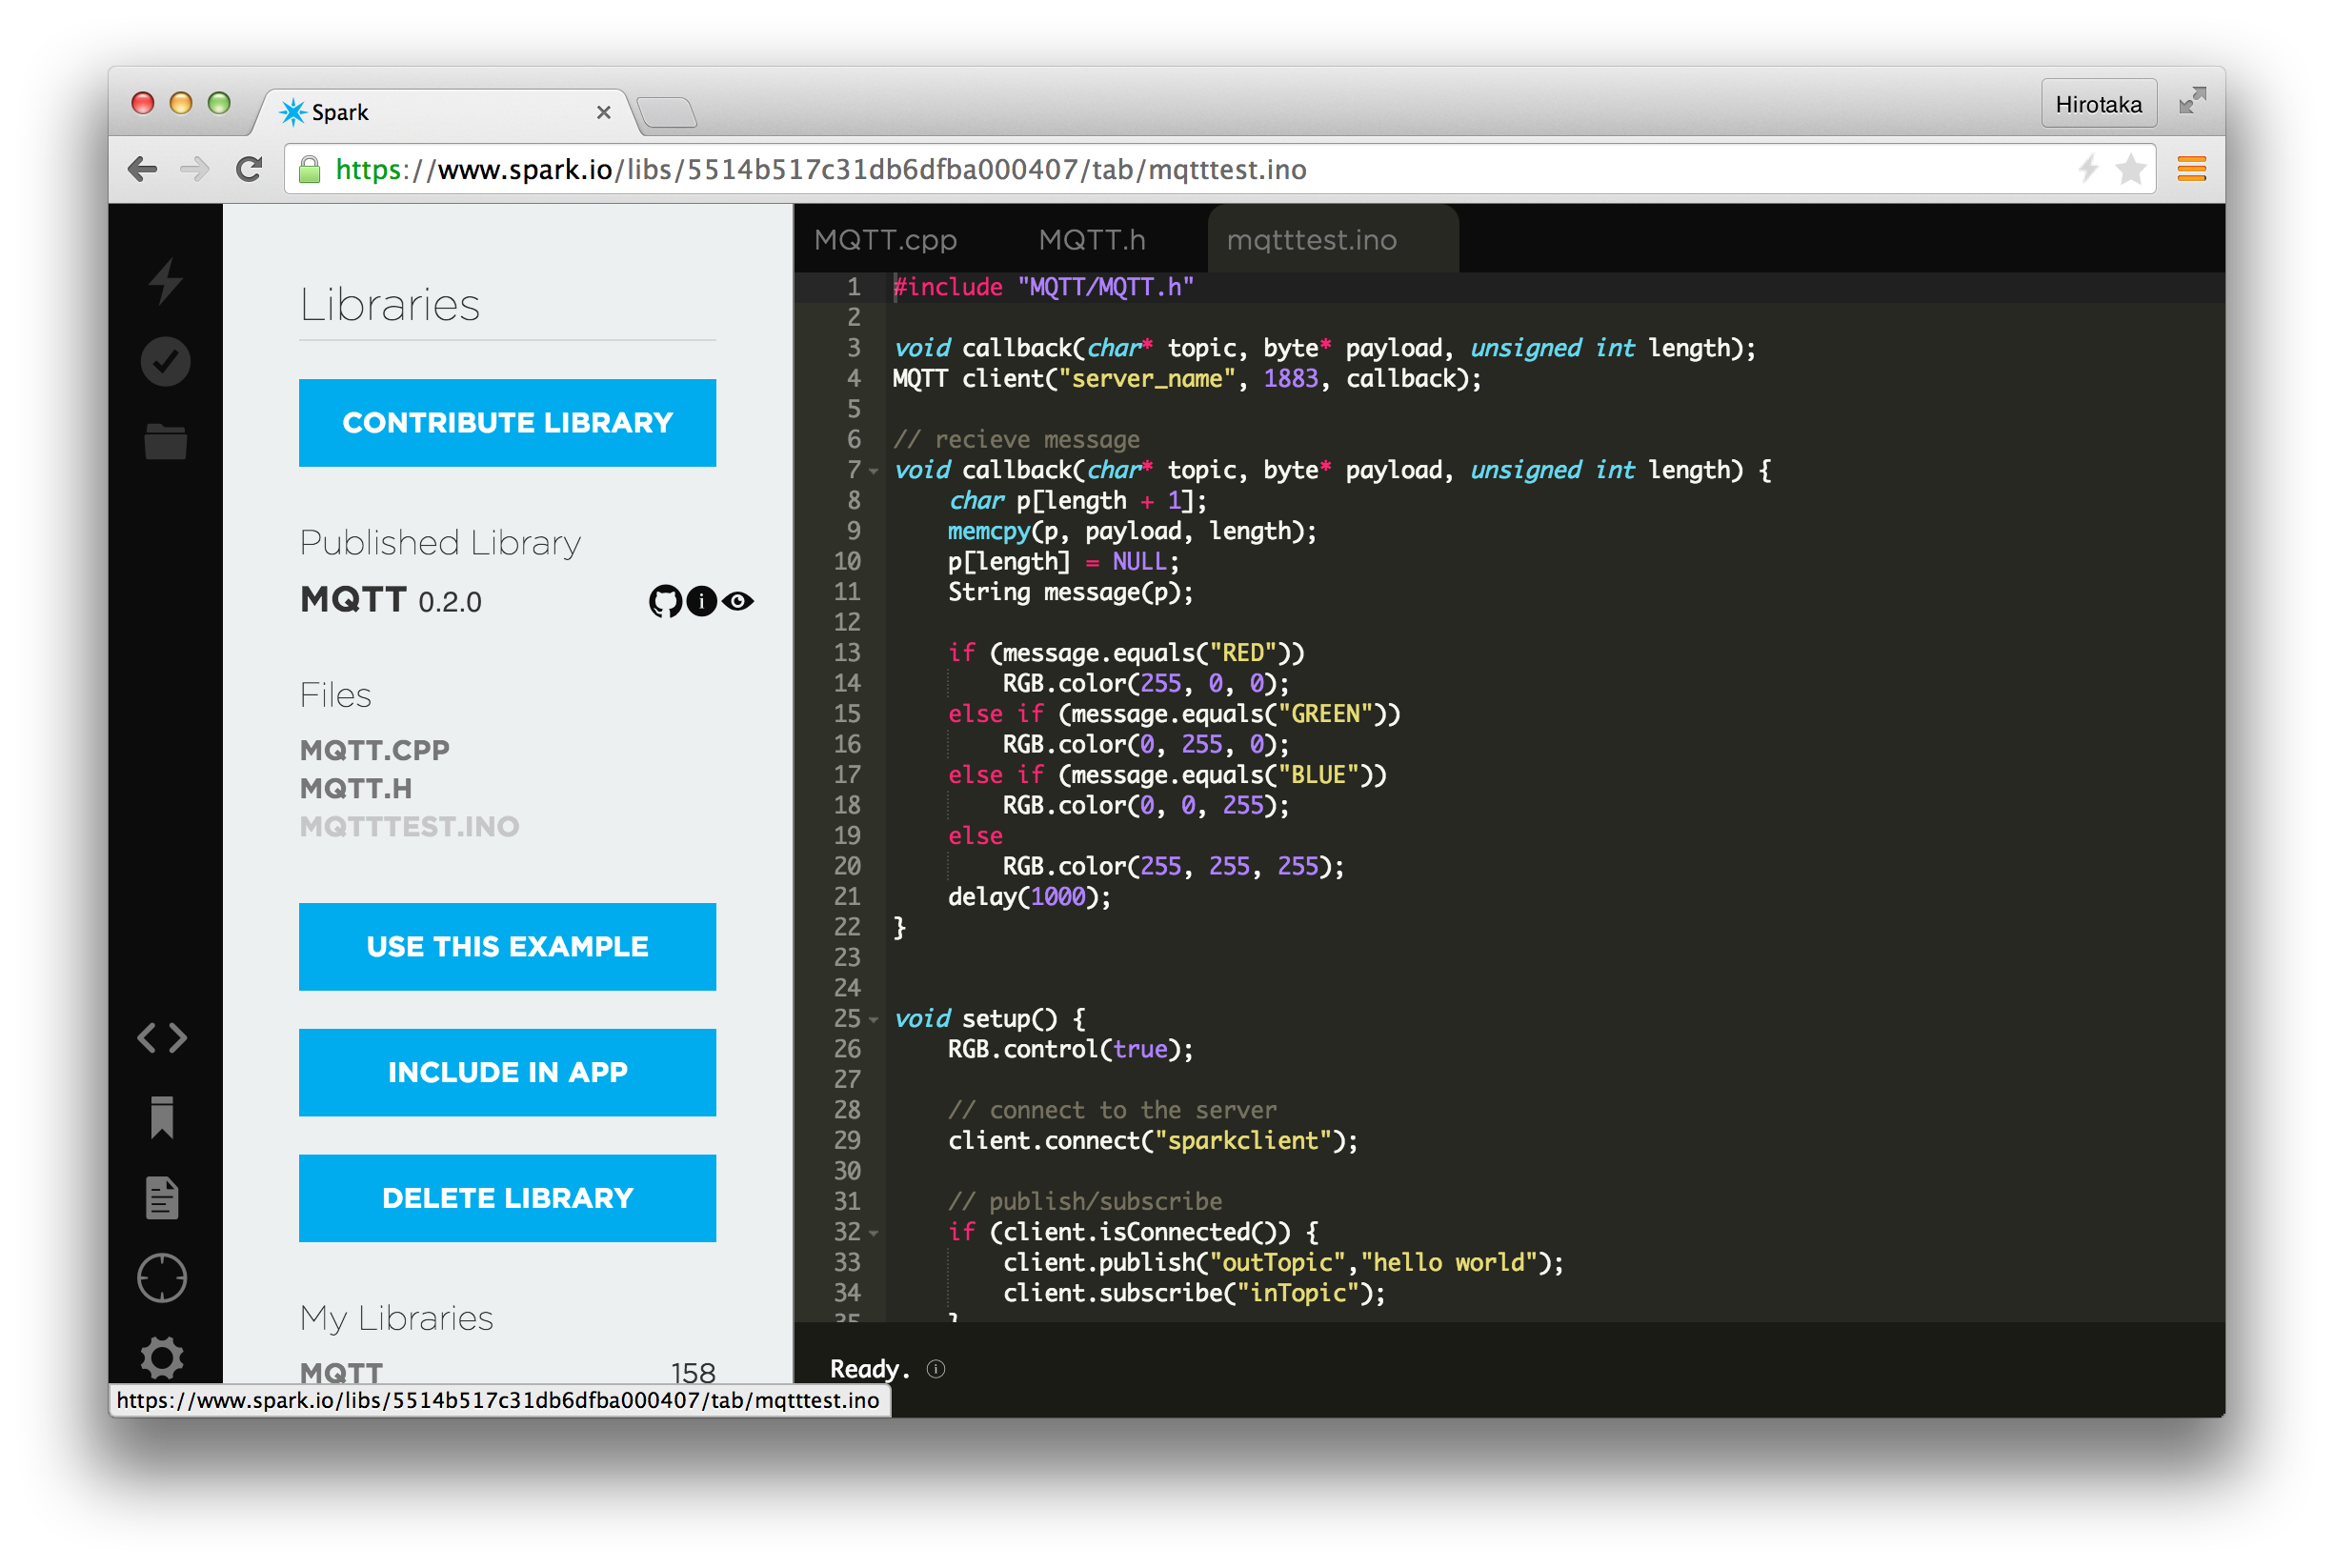
3. LEDを光らせてみる
サーバ上でコマンドを実行すると、SparkのLEDが変わる。
mosquitto_pub -h localhost -t inTopic -m RED
mosquitto_pub -h localhost -t inTopic -m BLUE
mosquitto_pub -h localhost -t inTopic -m GREEN
mosquitto_pub -h localhost -t inTopic -m OTHER
Spark側でSubscribeしている”inTopic”に向けてメッセージを投げている。サーバ側でoutTopicを見ていると起動時に”hello world”が流れてくると思われ。
– もちょっと面白く使いたい
JavaScriptからWebSocketでMQTTを直撃で叩きたいという気持ちになると思われ。まぁ、これもサクっと簡単に出来る。よくあるlighttpd+mod_websocketでサクットやる。
1. mod_websocketを動かす
とりあえずサクっと動かすって事で、lighttpd+mod_websocketをシングルで動かす。
apt-get install gcc make libpcre3-dev zlib1g-dev libbz2-dev automake libtool openssl libssl-dev unzip g++ libev-dev libev4 pkg-config
git clone git://github.com/nori0428/mod_websocket.git
cd mod_websocket/
./bootstrap
sh ./makesample.sh
cd sample
./sbin/lighttpd -f ./etc/lighttpd.conf
2. Webサーバ上でPahoを動かす
PahoはEcilpseで提供されているMQTTのライブラリでJSの他にも色々あったりする。最初に使ってみる物としては多いと思われ。
wget http://ftp.pgpi.org/pub/eclipse/paho/1.0/paho.javascript-1.0.1.zip
unzip paho.javascript-1.0.1.zip
cd paho.javascript-1.0.1/
# 以下のHTMLをindex.htmlとか適当に追加
# Paho.MQTT.Clientの所でIPを自分のサーバに向ける
<html>
<head>
<script type="text/javascript" src="mqttws31.js"></script>
<script type="text/javascript">
var client;
var form = document.getElementById("tutorial");
function doConnect() {
client = new Paho.MQTT.Client("IP Address", 8080, "ClientId");
client.onConnect = onConnect;
client.onMessageArrived = onMessageArrived;
client.onConnectionLost = onConnectionLost;
client.connect({onSuccess:onConnect});
}
function doSubscribe()
client.subscribe("/outTopic");
}
function doSend() {
ledcolor = ["RED", "BLUE", "GREEN"];
message = new Paho.MQTT.Message(ledcolor[Math.floor(Math.random() * 3)]);
message.destinationName = "/inTopic";
client.send(message);
}
function doDisconnect() {
client.disconnect();
}
function onConnect() {
var form = document.getElementById("example");
form.connected.checked= true;
}
function onConnectionLost(responseObject) {
var form = document.getElementById("example");
form.connected.checked= false;
if (responseObject.errorCode !== 0)
alert(client.clientId+"\n"+responseObject.errorCode);
}
function onMessageArrived(message) {
var form = document.getElementById("example");
form.receiveMsg.value = message.payloadString;
}
</script>
</head>
<body>
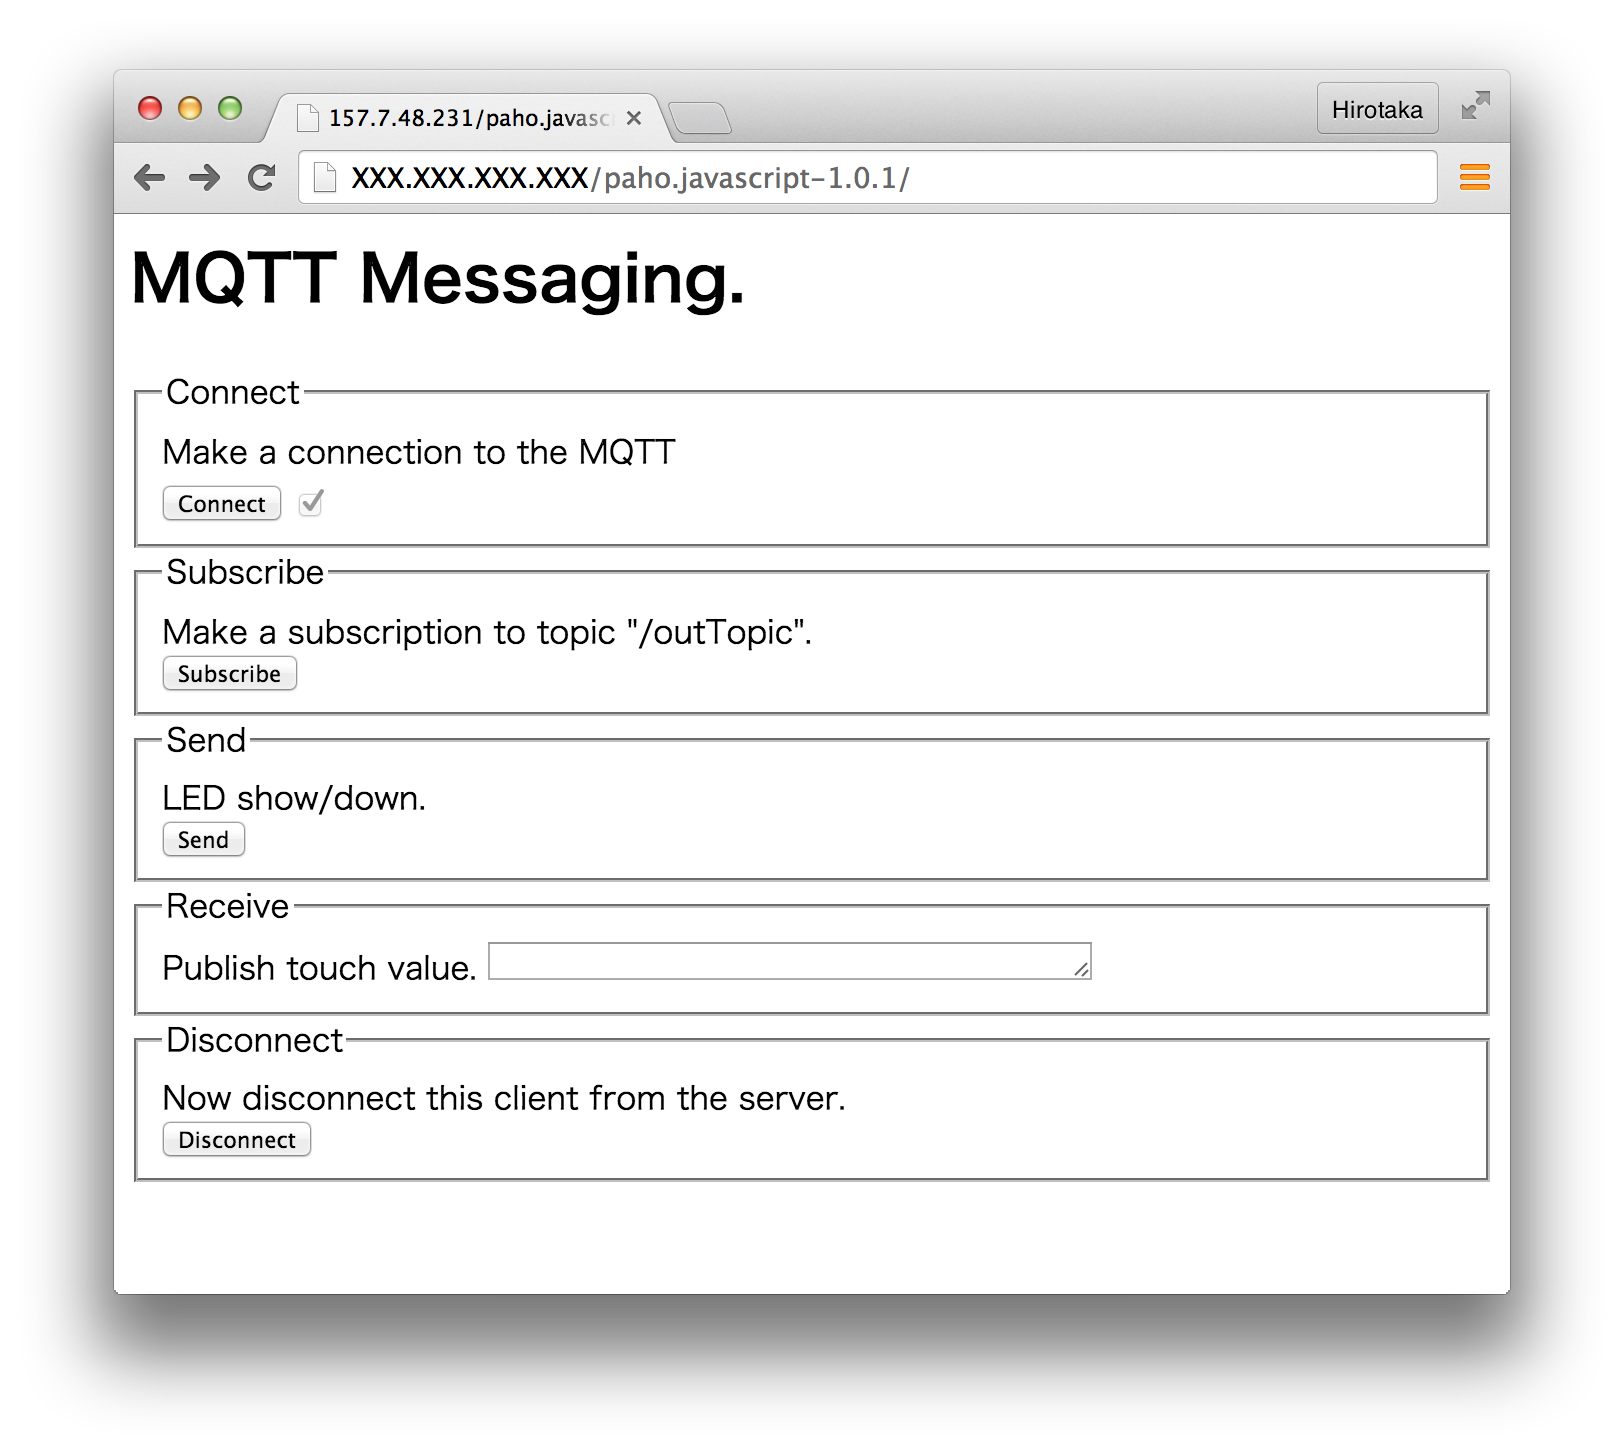
<h1>MQTT Messaging.</h1>
<form id="example">
<fieldset>
<legend id="Connect" > Connect </legend>
Make a connection to the MQTT
<br>
<input type="button" value="Connect" onClick="doConnect(this.form)" name="Connect"/>
<input type="checkbox" name="connected" disabled="disabled"/>
</fieldset>
<fieldset>
<legend id="Subscribe" > Subscribe </legend>
Make a subscription to topic "/outTopic".
<br> <input type="button" value="Subscribe" onClick="doSubscribe(this.form)"/>
</fieldset>
<fieldset>
<legend id="Send" > Send </legend>
LED show/down.
<br>
<input type="button" value="Send" onClick="doSend(this.form)"/>
</fieldset>
<fieldset>
<legend id="Receive" > Receive </legend>
Publish touch value.
<textarea name="receiveMsg" rows="1" cols="40" disabled="disabled"></textarea>
</fieldset>
<fieldset>
<legend id="Disconnect" > Disconnect </legend>
Now disconnect this client from the server.
<br> <input type="button" value="Disconnect" onClick="doDisconnect()"/>
</fieldset>
</form>
</body>
</html>
んでページを見てみるとこんな感じに。Connectして接続してMQTTのPub/SubがJS経由でサクっと出来る。